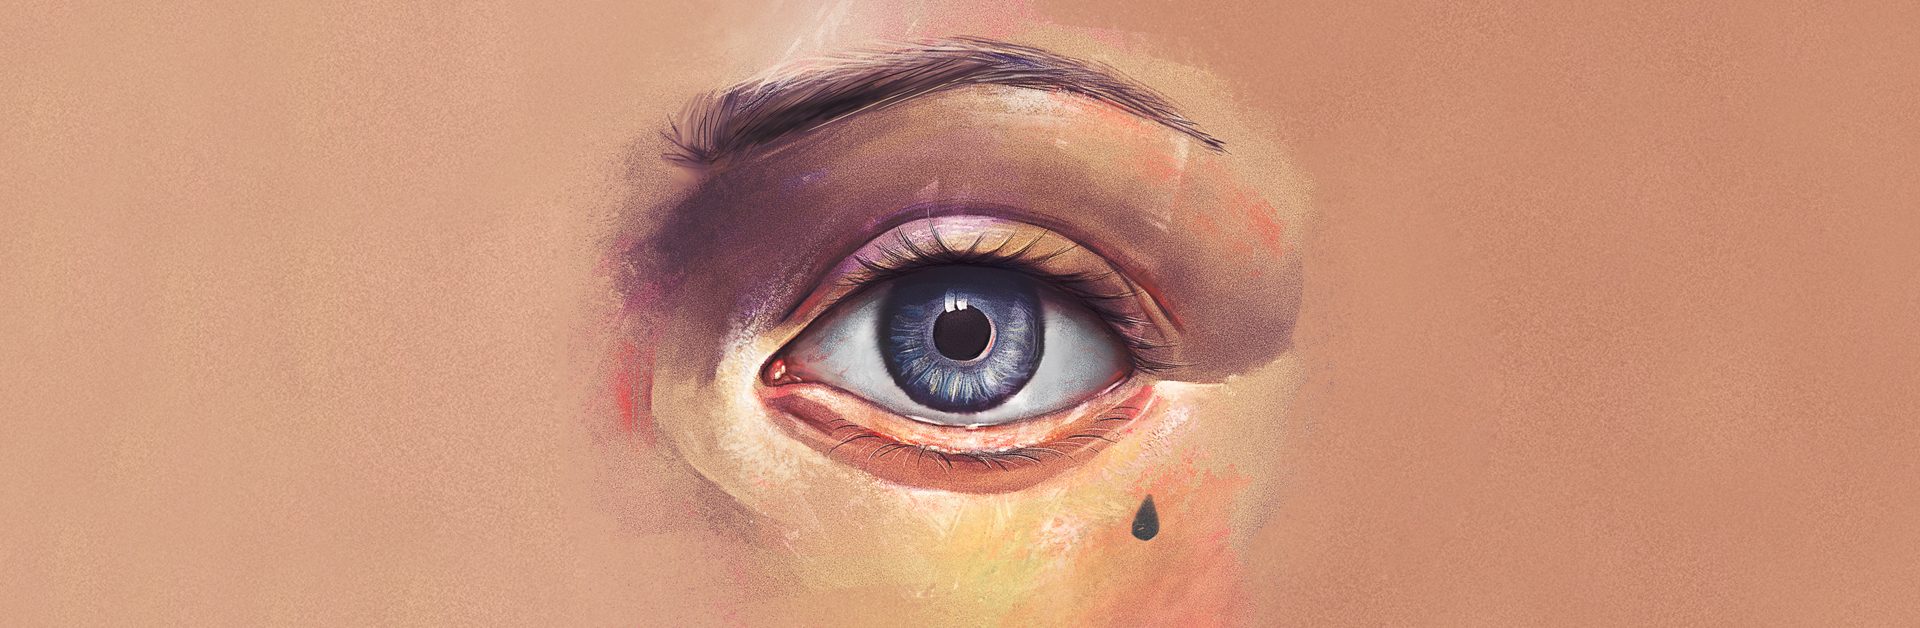
They say that eyes are windows to the soul...
From our hidden thoughts to our deepest emotions, eyes can tell us an awful lot about someone. If we wish to paint a truly expressive portrait, it’s vital to learn how to paint realistic eyes.
Let’s jump right in!

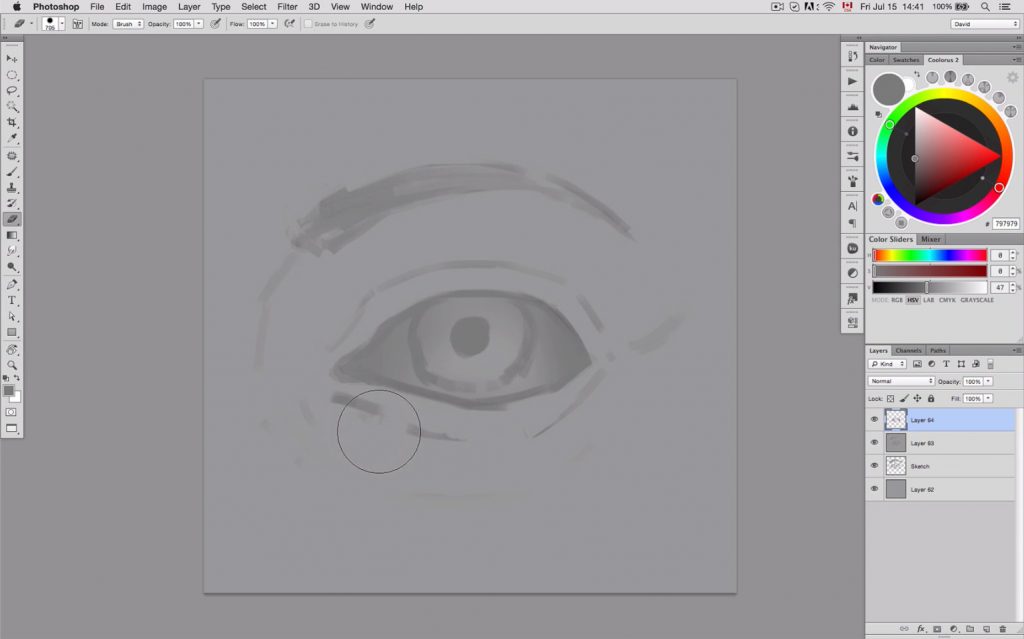
STEP 1: Sketch An Outline
1. Begin your rough outline on a midtone background
Using a relatively large brush, begin to sketch the outline of your eye. If you aren’t 100% familiar with eyes, I HIGHLY recommend you use a reference photo.. it’s the best way to learn!
You can use any brush you want, but make sure you don’t go into too many details. You are just building a basic ‘roadmap’ for your painting.
Tip: When sketching, going into too much detail will slow you down and make your life more difficult. Avoid the temptation by selecting slightly larger brushes.
(RELATED: Why You Should Start Your Painting With a Midtone Background)
2. Develop your sketch, and don't be afraid to erase and re-draw lines
It’s actually fairly difficult to sketch on a tablet. Don’t get frustrated! The beauty of digital painting is that you can delete and re-draw your lines as many times as you need to.
Remember: This is not meant to be polished linework! It is simply a roadmap for your painting. I’ll show you how to paint realistic eyes in time, for now keep it sketchy and loose.
STEP 2: Rendering The Eye
The 'Brush and Cut' Method
Before we begin rendering in detail, it is important you understand one of the most common techniques in digital painting. I like it call it the Brush and Cut method.
The basic principle is this:
- Create a new layer
- Brush on a shape (usually with a soft brush)
- Cut one or more edges out of this shape (usually with a hard eraser)
Lets have a look at an example:
1. Merge the sketch and background, then create a new layer
The first step is to merge your sketch with your background. I personally like to use Ctrl/Command+Alt+Shift+E to merge everything to a new layer on top. This way you still have your sketch as a separate layer, in case you need to go back to it in the future.
Then, create a new layer by pressing Ctrl/Command+Shift+N.
2. Add shading to the eyeball with a soft, round brush
On the new layer, begin to add some shading around the outside of the eyeball. Do this by painting just outside of the lines of the eye.
3. 'Cut' away the values outside of the eyeball with a hard-edged eraser
Erase everything that spills outside of the outlines of the eye.
As you can see, the Brush and Cut method allows us to very easily create areas of values that have a soft, gradient edge on one side, and a hard-cut edge on the other.
This has allowed us to paint the basic shading around the outside of the eye, giving it a 3D look.
Note how rough everything is still looking at this stage. That’s totally ok, don’t get frustrated!
Remember: The beauty of this method is that each new element you create is on a new layer. You can keep playing around with it, brushing and cutting the shape without fear of wrecking anything you’ve already painted.
And if everything is looking too light or dark, you can play around with the layer’s Opacity in the ‘Layers’ panel.
4. Use variations of this method to continue rendering
You don’t have to Brush and Cut with a soft brush and hard eraser. You could just as well brush in areas of values with a harder brush, then fade out the edges with a softer brush.
5. Use the Marquee Tool to Paint a Perfectly Circular Iris
You don’t have to paint everything by hand. Often you will get better results by using the other tools at your disposal, such as the Elliptical Marquee Tool (keyboard shortcut: M).
I first erased the iris from my sketch. I then made a selection with the Elliptical Marquee Tool on a new layer, and filled it with light gray. As it was on a new layer I could use the Free Transform Tool (Ctrl/Command+T) to reposition it.
6. Tip: Blending With the Smudge Tool
One very useful tool for blending is the Smudge tool. I prepared a tool preset for you which contains my favourite Smudge settings. You can find it in the downloadable brush files.
> Click Here to Download Tutorial Brushes
You can use the Smudge tool to blend lines in your painting, and smoothen out hard edges.
(Related – 4 Essential Techniques for Blending in Photoshop)
7. Keep Rendering the eye!
Keep painting values bit by bit. Make sure to start with the big areas of high and low values, before zooming in and painting in the little details with a smaller brush.
Here is a tip you might find useful if you find yourself getting caught up in the details too soon.
Besides some of the techniques mentioned above, there isn’t an exact ‘science’ to rendering. It is largely a matter of taking the time to study your reference image . Make sure to keep rendering even if you’re feeling frustrated. And of course, practice, practice, practice!
TIP: To see my full rendering process, and learn about many more tips and techniques (such as using Liquify to fix proportions or Adjustment Layers to boost contrast) make sure to watch the full video.
STEP 3: Adding Eye Details
1. Adding Details in the Highlights
You don’t need to go adding intricate details to every square inch (or pixel) of your painting. In fact, sometimes less is more.
Details in key areas (ie. extreme highlights and shadows) will be much more noticable. Focus on these, and you will create the illusion that the whole piece is intricately detailed.
I personally like to start by using a textured brush to add highlights.
2. ...Then the Shadows
Still using a textured brush, I will then begin to add some shadow details. I paint everything on a new layer, so that I can go back and erase it, using the Brush and Cut method to blend it into the painting.
3. Adding Details to the Iris
Use a small, light brush to paint in lines around the iris. Then, go over and blend them with the smudge tool to make sure the lines aren’t too sharp.
4. Penciling in the Eyelashes
On a new layer, begin with a big brush, to paint in the basic shape the eyelashes will occupy. Then drop the opacity, and paint individual eyelashes over this shape with a fine brush.
5. Pro-Tip: Adding the Eyelash Highlights
Here’s a tip for creating extra realism in the eyelashes:
As you’ve painted the eyelashes on a new layer, you can now Ctrl/Command+Click on the layer’s Thumbnail in the Layer icon to make a selection of the eyelashes.
Hide the selection (Cmd/Ctrl+H), and select a light, soft brush. Brush over the selected area to create highlights for your eyelashes.
Then, go to Edit > Transform > Skew and skew the highlights slightly towards one side. This will create the illusion of a few highlighted eyelashes poking out in between the rest.
6. Painting Details in the Eyebrows
The trick to painting hair is to think of it as a geometric shape, rather than a collection of thousands of individual hairs. Paint the overall shape first, then add individual hairs in key areas (highlights + shadows).
(Related – How to Paint Hair Quickly and Effectively)
STEP 4: Post-Production
1. Add the Glossy Highlights
OK so this one’s technically more of a detail than post-production work. But it makes such a big difference that I wanted to save it till last.
Depending on your light source, you will want to paint in a few reflection spots on your eye. These will give the eye a glossy, wet look and really make them POP.
2. Tweak the Brightness/Contrast
Add a Brightness/Contrast adjustment layer to your painting by clicking the Adjustment Layer icon in the Layers panel.
Make a few small tweaks to up the contrast and give your painting a bit more of a ‘punch’. Be careful not to overdo it, however!
3. Add Some Noise
This step is optional, but I find that especially when painting skin, adding a bit of noise can go a long way in making the details pop.
To do this, merge your painting to a new layer (Ctrl/Cmd+Alt+Shift+E), then go to Filter > Add Noise.
Depending on the size of your canvas you will need to play around with the options. Make sure to add a touch, don’t overdo it. Often less is more!
4. Paint the Shadow Casted by the Upper Eyelid
Using the Brush and Cut method, add a highlight to the top of the eyeball, and erase away everything that spills over the top eyelid.
5. Add Final Touches With the Sharpen Tool
The Sharpen Tool is perfect to add little spots of increased details throughout key areas of your paintings. Use it in moderation and don’t overdo it (stop me if you’ve heard this before!).
I would recommend using the Sharpen tool on a new layer, by selecting “Sample All Layer’s” in the toolbar at the top. This way all changes are created to the top layer, and you can actually go back and erase parts of them using the Brush and Cut method.
Final Step: Admire Your Perfect Pair of Eyes!
As creatives we often have a tendency to be unnecessarily hard on ourselves. Sit back and enjoy the fruit of your labor! And remember, the key to learning digital painting is to practice, practice, practice.
If you’d like feedback on your work just post it in our Paintable Facebook Group!
Learn to Paint Your Own
Eye-Catching
Masterpiece!
10 'MUST HAVE' BRUSHES FOR PAINTING
Free Download:
- Flowing & life-like hair
- Freckles & beauty spots
- Stubbles & beards of all sizes
- Realistic skin textures
- ABR Brushes (Photoshop & Procreate)
- SUT Brushes (Clip Studio Paint)


8 thoughts on “How to Paint Realistic Eyes: The Ultimate Guide”
Thank you very much for this Tutorial, danke sehr
Our pleasure! Hope you found it useful 🙂
Thanks I haven’t started any of the tutorials yet but I am currently struggling with portraits and it seems like you guys have solid methods that’ll stick.
IF you’re interested in painting portraits, we also have a free 1-week mini-course called One Week Portrait, be sure to check that out!
What program do you use to paint? I only have coral painter 4 or something like that.
Adobe Photoshop CS6, with the Coolorus color wheel installed 😉
Thanks alot for this tutorial. I was wondering what kind of brushes set are you using , since I’m not able to see it in the free brush pack? No mind on buying them neigther , they look great.
Thanks
Hi, Gabriel! David’s using a couple brushes here, primarily the hard and soft rounds. Textured brushes may be default texture brushes or ones from the pack- this is one of our legacy tutorials. 😉