Cover image by Yasar Vurdem
Unlike painting oil on canvas, nothing in digital painting is permanent. Thanks to the power of layers, we re-arrange and modify everything we paint, and try infinite compositions and layouts.
This allows us to take creative risks and try new things, without the risk of ruining everything we’ve already spent hours on.
We’ve gathered a selection of 50 tips, tricks and shortcuts to power up the way you use layers in your digital painting!
Related: How to Use Layers in Digital Painting: A Complete Guide
Layers are a powerful addition to digital painting...

Tips & Tricks for Using Layers
The basic principles of using layers are quite straight forward. What you may not know is that Photoshop actually offers a lot of tricks and techniques that make layers even more powerful!
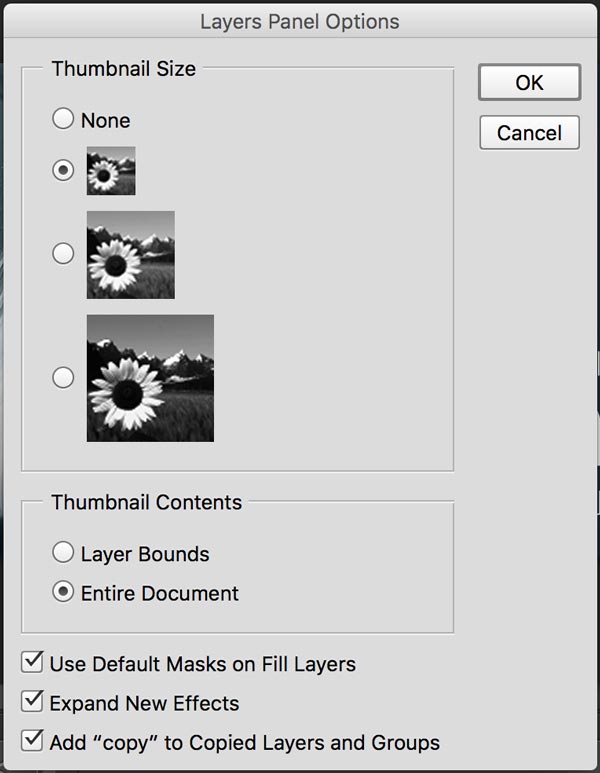
01. Bigger/Smaller Layer Thumbnails
You can change the size of the thumbnails in your layers panel, in the ‘Panel Options’ menu. You can find this in the Fly-Out menu at the top, right hand side of the Layers Panel.
02. Lost in a Sea of Layers?
With the move tool selected you can ‘Right Click’ anywhere on you canvas to select layers. By doing so a small menu will pop-up on your screen with all the layers contained in the document. The very first layer at the top is the one you’ll have click on.
03. Auto-Select Layers or Groups
With the move tool selected, select the ‘Auto-Select’ checkbox in the toolbar at top. This will allow you to select a layer automatically by simply clicking on whatever it is you’ve painted on it. This is a huge time saver when you’re re-arranging lots of layers. You can also configure ‘Auto-Select’ to automatically select Groups rather than Layers
Tip: If you hold Shift, you can also select or deselect an already selected layer simply by clicking on it.
04. Excluding Layers from Auto-Select
Sometimes, when you’re trying to select a layer with Auto-Select, it always ends up selecting the wrong layer. This is especially frustrating when you’ve used layers to add texture or details on top, and want to select the layers below. To stop automatically selecting these layers, simply lock them.
05. View a Single Layer
If you want to see just one layer alone, without having to manually hide all other layers, simply hold down Alt and click the Eye icon of a layer to make every other layer invisible. Alt+Clicking on them again will bring them back.
Layers are a powerful tool, and one of the big advantages of working digitally!
Painting by Efflam Mercier
06. Quick Copy
Any mask, layer or group can be quickly copied in one of two ways. You can hold down Cmd+Alt and drag it, or you use the CMD/CTRL + J keyboard shortcut.
07. Link Similar Layers
Sometimes you may have two or more layers that have been used to paint the same object. If you want them to stay together, consider linking them. That way, when you move one of the layers, all the others will automatically move along with it.
08. Temporarily Unlink a Layer
To temporarily disable a layer link, Shift-click the Link icon for the linked layer. A red X will appear. Shift-click the link icon to enable the link again. This is useful if you want to quickly adjust a single layer, without having to unlink and then re-link the entire stack of layers.
09. Easily Change Opacity
When not using a painting tool, you can change layer Opacity – simply by pressing a number key. Hit 1 for 10%, 5 for 50%, and 0 for 100%.
10. Aligning Layers
With the Move tool selected, selecting multiple layers allows them be aligned and distributed using the Align and Distribute icons in the Options bar.
Use the align buttons to quickly line up elements on different layers
11. Select the Contents of a Layer
If you want to make a selection in the exact shape of the contents of that layer, simply hold CMD/CTRL and click on the Layer Thumbnail in the Layers Panel. By holding Shift you can add further layers to the selection, while holding Option/Alt will subtract them.Tip: Holding both CMD/CTRL as well as Option/Alt will create the intersection of two layers.
12. Unlock the Background Layer
When you open a photo or texture file inside Photoshop, the bottom layer will always be unlocked. This can be frustrating when you’re trying to work with it. To unlock it, simply grab the lock icon and drag it onto the Trash icon at the bottom of the layer panel.
Staying Organised With Layer Groups
Layer groups are a great way to organise a complex, multi-layered painting. If you prefer to keep your layers separated (rather than merging them down), Layer Groups will save you hours of digging through your Layers Panel every time you try to find something.
13. Adding Groups
Simple click Create Layer Group (the folder) icon at the bottom of the Layers panel to add a new Group above the currently selected layer. You can then drag and drop your layers into the Layer Group, which you can collapse to de-clutter your layers panel
14. Adding Groups (Like a Boss)
Save yourself a step and feel like a wizard by selecting layers you wish to group before grouping them, then simply drag and dropping them onto the Create Layer Group icon.
Tip: Alternatively, use the keyboard shortcut Cmd/Ctrl + G with the layers selected.

Learn to speed up your workflow with shortcuts, like a boss! By Dominik Mayer
15. Open/Close all Nested Layer Groups
Alt+Click on a Layer Group’s arrow to open/close all nested Groups
16. Open/Close all Top Level Groups
Cmd/Ctrl + Click on a top level Layer Group’s arrow to open/close all top-level Groups
17. Can’t Remember the Shortcut?
If you can’t remember which of the previous two shortcuts is which, you can alternatively right click on the Layer Group’s arrow to see a drop-down menu with both choices
18. Delete Group Only (While Preserving Layers)
When you delete a Group, you can choose whether to delete or keep all the layers within it. Just select the Group and click the trash can icon. A dialog with open with the options to delete the “Group and Contents” (which deletes both), or to delete the “Group Only” (which removes any groups but leaves the layers).
19. Ungroup with shorcut
You can also simply ungroup a layer group by doing Cmd/Ctrl + Shift + G.
20. Pass Through vs Normal
By default, Layer Groups are set to allow blending effects (such as blending modes, adjustment layers, etc) to ‘pass through’ and be applied to layers below it. This is known as ‘Pass Through’. If you’d like to keep the blending effects contained within that group, change the Group’s blending mode to ‘Normal’.
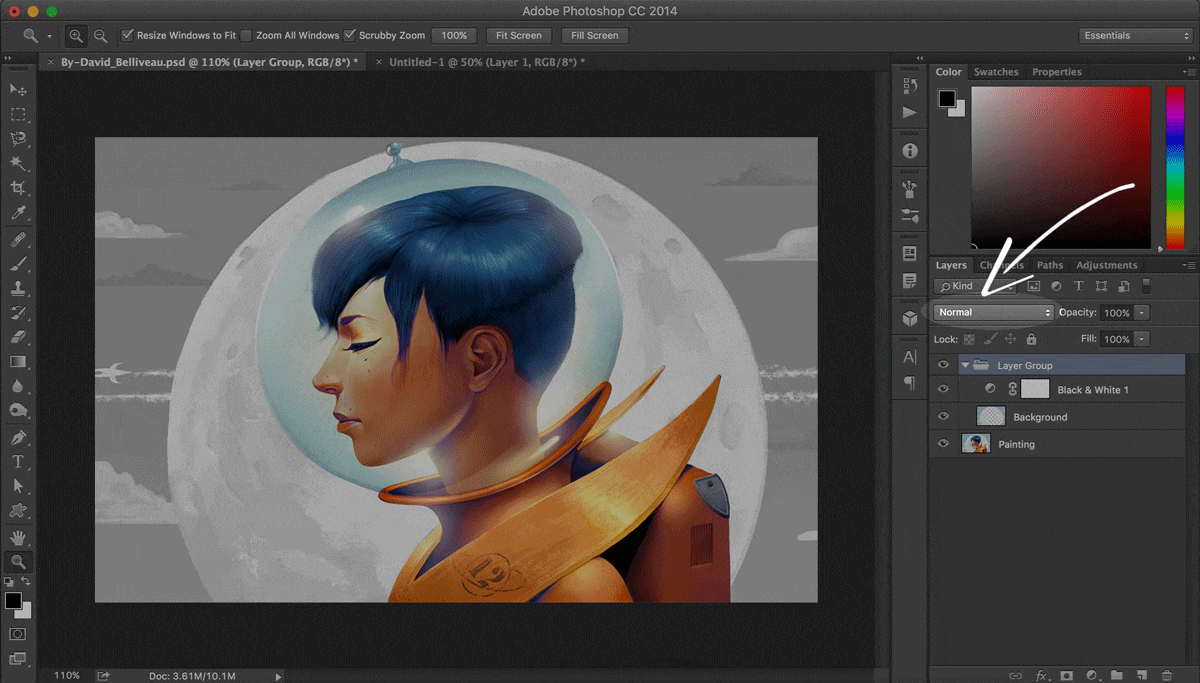
The ‘Pass Through’ blending mode allows the Black & White Filter to extend out of the group and apply to all layers underneath it
21. Lock All Layers Within Group
You can apply to ‘Lock All’ lock directly to Groups – which will automatically apply to everything within that group. If you’d like to apply any of the other locks (ie. ‘Transparency’ or ‘Position’ locks), select the Group, then select Layer > Lock all Layers in Group

Using layers will allow you to experiment with different elements in your painting. Painting by Serge Birault
Working With Layer Masks In Your Digital Paintings
Whenever possible, you should try to use layer masks rather than the eraser tool. They are non-destructive, meaning you’re never actually deleting pixels, only hiding them.
They’re also incredibly useful in digital painting, as they allow you to ‘mask’ details, textures or other values – making sure you’re only painting within a boundary.
22. Make a Layer Mask
To make a layer mask, simply select a layer, then click the ‘Add Layer Mask’ button at the bottom of the layer panel
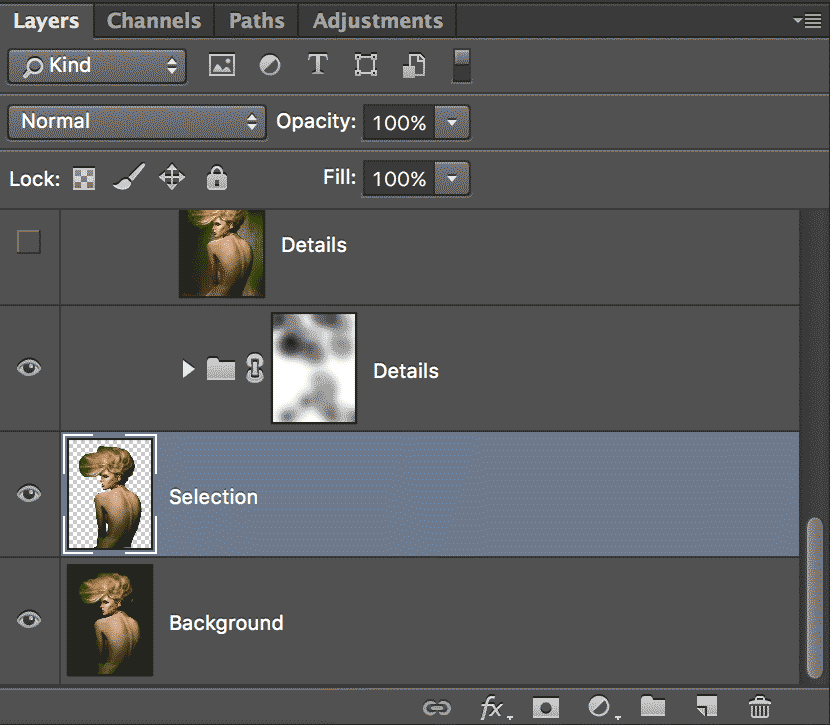
23. Perfectly Fitting Layer Mask from Selection
If you already have a selection made when you press the ‘Add Layer Mask’ button, Photoshop will create a new mask and automatically mask out everything not included in the selection.
24. Temporarily Disabling Layer Masks
If you’d like to quickly see everything being hidden by a layer mask, you can temporarily disable it by Shift + Clicking on the Mask in the Layers Panel. This will save you the time and effort of having to Delete, then Undo Deleting layer masks.
25. Invert a Layer Mask
You can quickly invert a layer mask by selecting it and pressing Cmd/Ctrl + I. This is useful for quickly hiding an effect you just painted.
26. Stacking Layer Masks
Sometimes, you may need more than one layer mask. For example, you want to use one layer mask to outline the silhouette of a portrait, then a second layer mask to hide details only in certain areas of the face.
Unfortunately, Photoshop won’t allow us to create more than one Layer Mask per Layer. However, one way to get around this is to place the Layer (with Layer Mask) within a Layer Group, and then applying a second Layer Mask to that Group. This process can be repeated over and over again, if you require multiple masks.
27. Isolate a Layer Mask
If you’d like to see exactly what the shape of the layer mask is, you can Alt-Click on it’s thumbnail in the Layer Panel. Alt-Click on it again to go back to the regular view.
Pro-Tips for Using Photoshop Layers
Try these slightly more advance tips in your next digital painting!
28. The 50% Grey 'Overlay' Layer
Adjustment Layers are great for adding effects, but what if you want to add texture or shading in a non-destructive way? What if you know an element needs more shadows, but you don’t want to paint over it and wreck it?
The answer is the Midtone Overlay Layer – a layer filled with 50% gray (also known as a ‘midtone’), and set to the ‘Overlay’ blending mode. You can now use Dodge and Burn to add highlights and shadows, or even add details with a texture brush. And because it’s on a new layer, you can hide or lower the opacity at any point, and your original layer remains untouched.
Pro Pro-Tip: If you find yourself using this a lot, you can create an action and set it to a keyboard shortcut
29. Reverse the Layer Order
Want to reverse the order of a stack of layers? Rather than painfully having to drag and drop each layer in the Layers Panel, simply select them, and go to Layer > Arrange > Reverse.
Note: This won’t work if the layers are in different groups
30. Nesting Smart Objects
By transforming layers into Smart Objects, you can keep shrink them, and blow them up again without losing quality. But did you know you can put a Smart Object within a Smart Object? Just include your Smart Object in a selection of layers, right click on a selected layer and hit ‘Convert to Smart Object’ Just like Inception!
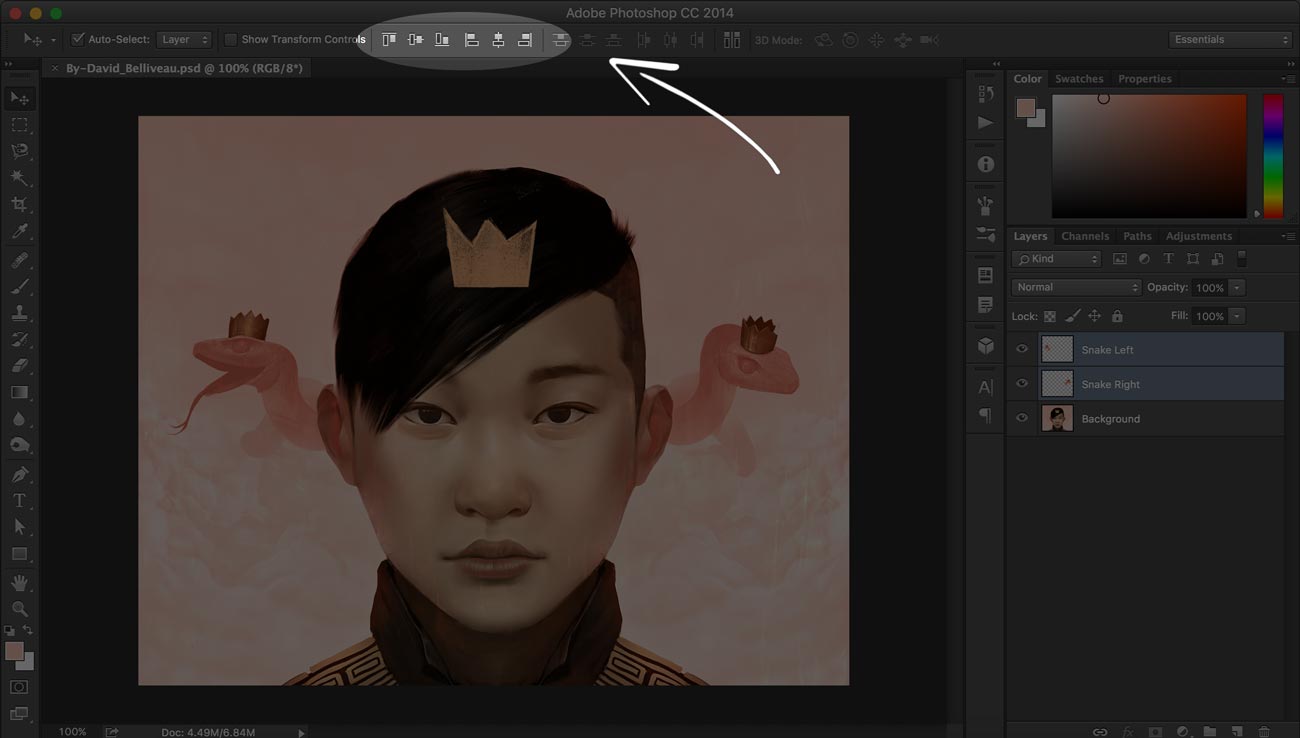
31. Always Show Transform Handles
If you’re doing a lot of resizing and re-positioning, you may want to set the transform handles to show all the time. This will save you the hassle of having to press CTRL/CMD+T to resize them every single time. To do this, simply select the Move tool, and then from the options bar, select Show Transform Controls.

A 50% gray overlay layer will allow you to experiment with shadows and highlights. Painting by Viktor Miller-Gausa
The Most Useful Photoshop Layer Shortcuts for Digital Painting
Few things will speed up your workflow as much as learning to use shortcuts. Especially when you’re working with a graphic tablet, performing actions with your other hand on the keyboard will be a huge time-saver!
32. Create a New Layer
Tip: Holding ‘Alt’ will skip the dialogue box
- Windows: Shift+Ctrl+N
- Mac: Shift+Cmd+N

Make a selection and use ‘Clone Selection To New Layer’ to isolate an area of your digital painting on a new layer
33. Clone Selection to a New Layer
Make a selection, then apply this command to make a quick copy of it to a new layer.
- Windows: Ctrl+J
- Mac: Cmd+J
34. Fill a Layer/Selection With Foreground Color
Fills your selection with your current foreground color
- Windows: Alt+Backspace
- Mac: Option+Delete
35. Fill a Layer/Selection With Background Color
This is much faster and more efficient than using the paint-bucket tool.
- Windows: Ctrl+Backspace
- Mac: Cmd+Delete
36. Merge Everything to Top Layer
Useful to create a quick ‘copy’, so you can flatten everything to the top without losing your original layers.
- Windows: Ctrl+Alt+Shift+E
- Mac: Cmd+Alt+Shift+E
37. Merge All Visible Layers
This will preserve your hidden layers, and prevent them from being merged to the stack.
- Windows: Ctrl+Shift+E
- Mac: Cmd+Shift+E
38. Merge Down
Quickly merge your current layer down to the one beneath it.
- Windows: Ctrl+E
- Mac: Cmd+E
39. Stamp Down Selected Layers
This will ‘stamp’ your current layer down, merging it with the layer underneath it, while still preserving it as a separate layer
- Windows: Ctrl+Alt+E
- Mac: Cmd+Alt+E
40. Copy Across Multiple Layers
A variation of the standard ‘Ctrl/Cmd + C’ Copy shortcut, make a selection and use this to copy across all layers
- Windows: Ctrl+Shift+C
- Mac: Cmd+Shift+C
41. Select All Layers
Useful if you need to make a quick adjustment to all layers
- Windows: Ctrl+Alt+A
- Mac: Cmd+Opt+A
42. Select Bottom Layer
This will select the bottom layer in the layers panel.
- Windows: Alt+,
- Mac: Opt+,
43. Select Top Layer
This will select the top layer in the layers panel.
- Windows: Alt+.
- Mac: Opt+.
44. Select Multiple Layers
Hold Ctrl/Cmd while clicking on multiple layers to select them all.
- Windows: Ctrl+ (Click)
- Mac: Cmd+ (Click)
45. Select All Layers Between 2 Layers
Select a layer, hold ‘Shift’, then click on another one to select all layers between the two.
- Windows: Shift+ (Click)
- Mac: Shift+ (Click)
46. Group Layers
Select one or more layers, then use this command to instantly group them
- Windows: Ctrl+G
- Mac: Cmd+G
TIP: Add Cmd/Ctrl to ungroup a Layer Group, while preserving the layers within it
Easily move layers up and down with shortcuts. Painting by David BelliveauHiba Tan
Speed Up Your Workflow by Re-Arranging Layers With Shortcuts
Rather than manually dragging layers around, use shortcuts so you can watch how it affects your painting in real time.
47. Bring Forward
Move the current layer ‘up’ one position in your layer stack
- Windows: Ctrl+]
- Mac: Cmd+]
48. Send Backward
Move the current layer ‘down’ one position in your layer stack
- Windows: Ctrl+[
- Mac: Cmd+[
49. Bring To Front
Instantly send the current layer to the very top slot of the Layer Panel
- Windows: Ctrl+Shift+]
- Mac: Cmd+Shift+]
50. Send to Back
Instantly send the current layer to the very bottom slot of the Layer Panel
- Windows: Ctrl+Shift+[
- Mac: Cmd+Shift+[
10 'MUST HAVE' BRUSHES FOR PAINTING
Free Download:
- Flowing & life-like hair
- Freckles & beauty spots
- Stubbles & beards of all sizes
- Realistic skin textures
- ABR Brushes (Photoshop & Procreate)
- SUT Brushes (Clip Studio Paint)


2 thoughts on “How to Use Layers in Digital Painting: 50 Essential Tips, Tricks & Shortcuts”
Tips 2 and 3 are the same.
Tips 20 and 21 also are the same.
Number 34 and 35: two different functionalities have the same shortcut.
Number 47: the description doesn’t match the label and shortcut.
Hi, Sylwia! Good eye, we contacted the team and got this set of errors fixed up. 🙂 Thanks for letting us know, and we’re happy to hear any feedback to help you all out!